

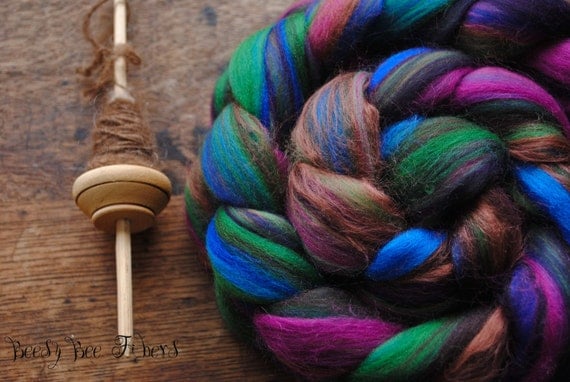
I promised that I would post a photo tutorial and show how I use my Merino Wool Blends to felt a scarf. This is a fun, easy and fast project. Almost instant gratification. What I like about working with these blends, is that it is not necessary to purchase several colors of wool to make a multi color scarf, like the one shown in the picture, which can become quite expensive. Also, storage can be a problem for most of us. One braid of 4 oz can probably be enough to make a couple scarves. The tops are already blended, just the right amount, so the colors don’t muddy up once they are felted. They are great for beginners, since one doesn’t need a big investment on materials to make a couple of scarfs.
For this particular scarf I used the Forest Jewels colorway (which is a blend of Merino with Soy Silk) for the front, and for the background I decided to used Merino in the Eggplant color which are both available at my shop. I also used a template for guidance, olive oil soap, bubble wrap and a pool noodle to be able to roll the project.
I also found in my stash, some fun pieces of fabric and some dyed locks to add as decoration. This is a great way to use bits and pieces of fabric remnants from past projects.
Laying it out
Start by laying your bubble wrap with the bubbles facing up. Next, measure and break apart a portion of the roving needed, leaving some room for the shrinking process to occur. 
Carefully and with patience, start by opening the wool as shown below. Make sure that the fibers stay in a vertical position.
Here you can play with the design by leaving some holes on purpose if you want some of the background layer to show. It’s like making rivers of colors. Keep opening the roving until you reach the size of your template if you are using one. I usually have one just because I don’t feel like measuring all the time.
As you can see in the picture, I left a few holes, but I kept moving the colors around a little. This is the fun part for me. One important note: I usually work my way from the front to the back, meaning that I lay my materials facing away from me.

Once I’m happy with how it looks, I move into laying out the background color, in which this case I used Merino in Eggplant.

For this particular project, I also added some fun crinkle silk gauze at the edge of the scarf. If you add some fabric, make sure to sandwich it between your front layer and the background to secure it. Once I feel that I’m done with the design, the next step to follow is to wet the entire project with soapy water.
Now is the time to roll the project. I’m not going to go deep here, because there are many tutorials on YouTube to do this. But I usually do 12 min. on each end. After rolling from both ends, it is important to check and see if the fibers are already felting. If not, then it will be necessary to repeat the rolling stage again. Once you see that there is some felting happening, the last step will be the fulling which consists of throwing the project against a hard surface… like your floor. But before doing this, it is useful to get rid of excess water, otherwise, you will be splashing water and soap just about everywhere. I usually go outside on the deck to do this. Be cautious when doing this because here is where the scarf will shrink even more and faster. Keep checking the size constantly.
Once you are done with the fulling, make sure to always rinse your felted projects in water with vinegar and hang your piece to let it dry. I like to press my scarves to give them a nice finish.

Here is how the Soy Silk looks after it has been felted into the wool. It forms nice wiggles on the surface. 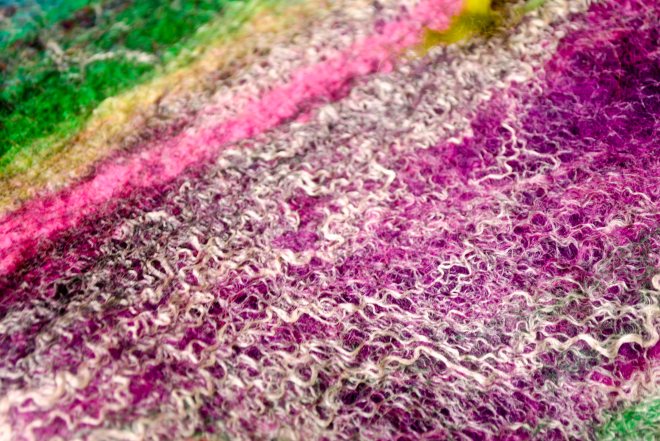
Crinkled Silk Gauze sandwiched between the two layers of wool.
The wool locks add color and texture.
This was a fun project! I think I will be working with the next color which is called Peacock. I will definitely post more pics.


Very Nice Blog Patricia. Thank you. Marlie
>
LikeLike
Patricia: Beautiful colors and embellishments. Please comment on how to go about attaching the wool locks to the felted piece while allowing most of the length of the locks to remain free hanging (unfelted). Thank you for your informative and inspirational tutorial!
LikeLike
Attach them between both layers of wool.
LikeLike
Thanks for sharing this – great inspiration for me to learn to felt!
LikeLike
I hope you try!
LikeLike
Thank you for sharing your techniques.
LikeLike
Just lovely!
LikeLike
Hi. Did you place the eggplant Merino right on top of the Forest Jewels colorway you had laid out? Thanks.
LikeLike
Super!
Thank you!
Looking forward to new work!
LikeLike
Hi, what is the size of your templets?
rgds Ann Sweden
LikeLike